Mummy Oreo Balls Recipe
Introduction
Looking for a spooktacular treat to delight your Halloween guests? Dive into the world of Mummy Oreo Balls with this easy-to-follow recipe guide. These adorable and delicious treats are sure to be a hit at any Halloween gathering. Let’s unwrap the secrets of creating these cute mummy-themed snacks that will leave everyone wanting more!
Why choose this Mummy Oreo Balls Recipe?
These Mummy Oreo Balls are not only a visual treat but also a delectable one! With a perfect blend of Oreo cookies, cream cheese, and white chocolate, they offer a delightful taste experience. Whether you’re a beginner or a seasoned baker, this recipe is simple to follow and guarantees impressive results. Get ready to impress your guests with these spooky yet scrumptious delights!
Ingredients for Mummy Oreo Balls Recipe
- 1 package of Oreo cookies (36 cookies)
- 8 oz of cream cheese (softened)
- 16 oz of white chocolate (melting wafers or white chocolate chips)
- Candy eyeballs
- Optional decorations
- Piping bag or ziplock bag
Preparation Steps for Mummy Oreo Balls Recipe
Step 1: Crush the Oreos
Begin by crushing the entire package of Oreo cookies, including the filling, into fine crumbs. You can use a food processor for this step or place the cookies in a ziplock bag and crush them with a rolling pin until finely ground.
Step 2: Mix with Cream Cheese
In a large mixing bowl, combine the crushed Oreos with the softened cream cheese. Mix thoroughly until the ingredients are well incorporated and the mixture has a dough-like consistency that is easy to shape into balls.
Step 3: Form the Balls
Roll the Oreo and cream cheese mixture into 1-inch balls and place them on a baking sheet lined with parchment paper. Depending on the size, you should be able to make around 30-36 balls.
Step 4: Chill the Balls
Place the baking sheet with the formed Oreo balls in the freezer for 20-30 minutes to allow them to firm up. This will make the balls easier to coat with the melted chocolate.
Step 5: Melt the White Chocolate
Melt the white chocolate either in the microwave in 20-second intervals, stirring in between, or using a double boiler until smooth and fully melted.
Step 6: Dip the Oreo Balls
Remove the chilled Oreo balls from the freezer and dip each ball into the melted white chocolate using a fork or toothpick. Ensure each ball is evenly coated before placing them back on the parchment-lined baking sheet.
Step 7: Decorate the Mummies
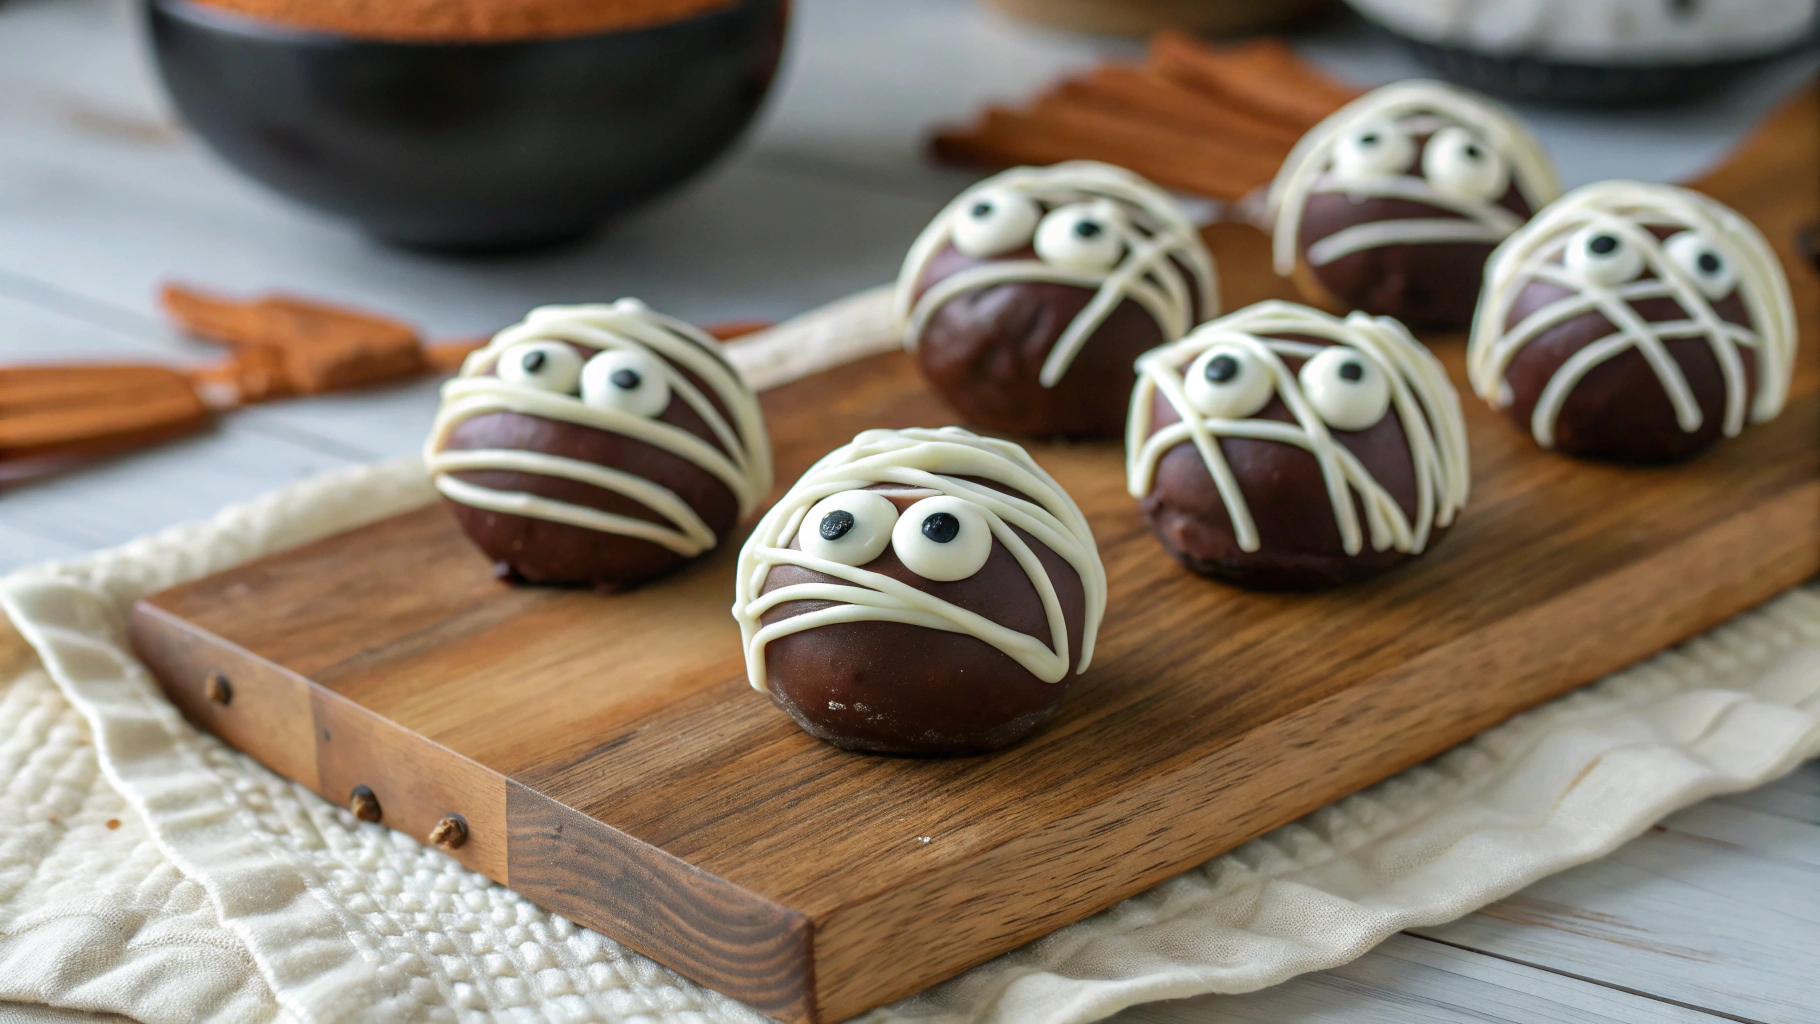
While the white chocolate coating is still wet, gently place two candy eyeballs on each mummy to create the eyes. For a more creative touch, use the piping bag or ziplock bag to pipe lines of white chocolate across the balls to resemble mummy wrappings.
Health Benefits of Mummy Oreo Balls Recipe
Unfortunately, Mummy Oreo Balls are not known for their health benefits as they are a sweet treat primarily made of Oreo cookies, cream cheese, and white chocolate. However, they can bring joy and satisfaction when enjoyed in moderation as part of a balanced diet.
Origin and History of the Mummy Oreo Balls Recipe
The Mummy Oreo Balls recipe is a creative and spooky twist on the classic Oreo truffles. These delightful treats are popular during Halloween for their fun and festive appearance. While the exact origin of the Mummy Oreo Balls recipe is unclear, it has gained popularity in recent years as a fun and easy-to-make Halloween dessert that appeals to both kids and adults.
Delicious Variations Around Mummy Oreo Balls Recipe
There are several ways to customize and enhance the traditional Mummy Oreo Balls recipe to suit different tastes and dietary preferences:
- Gluten-Free Option: Use gluten-free Oreo cookies to make the recipe suitable for individuals with gluten intolerance.
- Vegan Twist: Opt for vegan-friendly ingredients such as dairy-free cream cheese and chocolate to create a vegan version of Mummy Oreo Balls.
- Flavorful Varieties: Experiment with different Oreo flavors like mint, peanut butter, or golden Oreos to add a unique taste to your Oreo Balls.
- Chocolate Coating: Substitute white chocolate with dark or milk chocolate for a different flavor profile.
- Crunchy Addition: Add crushed nuts or crispy rice cereal to the Oreo mixture for an extra layer of texture.
These variations allow you to personalize your Mummy Oreo Balls and cater to various dietary restrictions, ensuring everyone can enjoy these spooky and delicious treats.
Chef’s Tips for Perfecting Your Mummy Oreo Balls Recipe
To ensure your Mummy Oreo Balls turn out perfectly every time, consider the following tips from culinary experts:
- Use Room Temperature Cream Cheese: Softened cream cheese blends more easily with the crushed Oreos, resulting in a smoother texture for your Oreo Balls.
- Chill the Oreo Balls: Cooling the formed Oreo balls in the freezer helps them firm up, making them easier to dip into the melted chocolate without losing their shape.
- Work Quickly: When dipping the Oreo balls in chocolate, work efficiently to prevent the chocolate from hardening before you finish coating all the balls.
- Get Creative with Decorations: Have fun decorating your Mummy Oreo Balls with candy eyeballs, food coloring, or sprinkles to give them a personalized and festive touch.
Looking for a delicious and spooky treat that’s perfect for Halloween? These Mummy Oreo Balls are not only fun to make, but they’re also a crowd-pleaser. In this article, you’ll learn how to create these adorable and tasty Halloween snacks step-by-step, including ingredients, variations, and presentation tips. Get ready to create a dessert that both kids and adults will love! Keep reading to learn how to make your own Mummy Oreo Balls and impress your guests with this Halloween delight!

What Are Mummy Oreo Balls?
Mummy Oreo Balls are a simple no-bake dessert made from crushed Oreo cookies, cream cheese, and white chocolate, shaped into spooky mummy figures. The process of making them is incredibly easy, making it an ideal recipe for both beginner and experienced bakers. These bite-sized treats are soft, creamy, and deliciously chocolatey on the inside, with a fun white chocolate mummy coating on the outside. They’re perfect for Halloween parties, and best of all, they require just a few ingredients and a little creativity.
Ingredients List for Mummy Oreo Balls
To make your Mummy Oreo Balls, you’ll need the following ingredients:
- 1 package of Oreo cookies (36 cookies) – Any flavor works, but classic Oreos give that perfect chocolaty flavor.
- 8 oz of cream cheese (softened) – This helps bind the crushed Oreos into smooth, creamy balls.
- 16 oz of white chocolate (melting wafers or white chocolate chips) – For coating the Oreo balls and giving them their mummy-like appearance.
- Candy eyeballs – These little edible eyes will bring your mummies to life! You can find them at most craft or grocery stores.
- Optional decorations – If you want to add more personality to your mummies, you can use food coloring or different kinds of sprinkles.
- Piping bag or ziplock bag – To pipe the chocolate onto the Oreo balls, creating the mummy “wraps.”
Substitutions and Variations
If you’d like to put a unique spin on your Mummy Oreo Balls or need to adjust the recipe to meet dietary needs, here are some substitutions and variations you can try:
- Gluten-Free Oreo Balls: If you’re catering to someone with gluten intolerance, use gluten-free Oreo cookies. Many brands now offer gluten-free versions that taste just as good as the original.
- Vegan Mummy Oreo Balls: For a vegan version, you can substitute the regular Oreos with a vegan-friendly brand and use a dairy-free cream cheese alternative. Make sure your white chocolate is also dairy-free.
- Flavored Oreo Variations: Switch up the flavor by using different Oreo varieties like mint, peanut butter, or golden Oreos. Each will give a unique taste to your Mummy Oreo Balls.
- Dark Chocolate Coating: If you’re not a fan of white chocolate, you can coat the Oreo balls with dark or milk chocolate. The “mummy wrap” design can still be made with a drizzle of white chocolate on top.
- Add Some Crunch: For a bit of texture, mix in some crushed nuts or crispy rice cereal into the Oreo mixture.
These variations allow you to customize your Mummy Oreo Balls according to your preferences and dietary restrictions, ensuring everyone can enjoy these spooky treats.
Step-by-Step Cooking Instructions

Making Mummy Oreo Balls is a simple process that doesn’t require any baking. Here’s how you can make them in just a few easy steps:
How to Cook Mummy Oreo Balls: A Step-by-Step Guide
- Crush the Oreos: Start by placing the entire package of Oreo cookies (including the filling) into a food processor. Pulse until the cookies are fine crumbs. If you don’t have a food processor, place the cookies in a ziplock bag and crush them with a rolling pin.
- Mix with Cream Cheese: In a large mixing bowl, combine the crushed Oreos and softened cream cheese. Use a spatula or your hands to mix until well combined and the mixture is smooth. The texture should be dough-like and easy to roll into balls.
- Form the Balls: Roll the Oreo mixture into 1-inch balls and place them on a baking sheet lined with parchment paper. You should be able to make around 30-36 balls depending on their size.
- Chill the Balls: Place the baking sheet with the Oreo balls in the freezer for about 20-30 minutes. This helps them firm up, making them easier to dip into the melted chocolate.
- Melt the White Chocolate: While the Oreo balls are chilling, melt your white chocolate. You can do this by microwaving the chocolate in 20-second intervals, stirring in between, until fully melted and smooth.
- Dip the Oreo Balls: Take the chilled Oreo balls out of the freezer and use a fork or toothpick to dip each ball into the melted white chocolate. Make sure the balls are fully coated and then place them back onto the parchment-lined baking sheet.
- Decorate the Mummies: While the white chocolate coating is still wet, carefully place two
Mistakes to Avoid When Preparing Mummy Oreo Balls Recipe
When making Mummy Oreo Balls, there are some common mistakes to watch out for to ensure your spooky treats turn out perfect:
1. Overmixing the Oreo mixture can make it too soft to form into balls properly.
2. Not chilling the Oreo balls adequately before dipping them in chocolate can cause them to fall apart.
3. Using too much cream cheese can make the mixture too wet and difficult to shape.
4. Not allowing the white chocolate coating to set before adding the mummy decorations can result in a messy appearance.
Ingredient Alternatives for Mummy Oreo Balls Recipe
If you want to experiment with different flavors or ingredients for your Mummy Oreo Balls, here are some alternatives to consider:
1. Instead of white chocolate, try a dark or milk chocolate coating for a different taste profile.
2. Use different types of cookies like graham crackers or chocolate wafers for a unique twist.
3. Add chopped nuts or dried fruits to the Oreo mixture for added texture and flavor.
Tips and Tricks to Perfect Your Mummy Oreo Balls Recipe
For flawless Mummy Oreo Balls every time, follow these expert tips and tricks:
1. Work quickly when dipping the Oreo balls in chocolate to prevent them from becoming too soft.
2. Use a toothpick to create fine details on the mummy decorations for a more realistic look.
3. Store your Mummy Oreo Balls in the refrigerator before serving to keep them firm and fresh.
Side Dish Suggestions for Mummy Oreo Balls Recipe
Pair your Mummy Oreo Balls with these delicious side dishes for a complete Halloween spread:
1. Pumpkin Spice Cupcakes – The warm flavors of pumpkin spice complement the chocolatey goodness of the Oreo balls.
2. Candy Corn Jello Shots – For the adults, these festive shots add a playful touch to your Halloween dessert table.
3. Witch Finger Cookies – A spooky and fun cookie that adds a creepy element to your Halloween treats.
FAQ about the recipe Mummy Oreo Balls Recipe
How to store the recipe Mummy Oreo Balls Recipe after cooking?
To store your Mummy Oreo Balls after making them, place them in an airtight container in the refrigerator. They can be stored for up to one week, allowing you to prepare them in advance for any upcoming events or parties. Just ensure they are properly sealed to maintain their freshness and taste.
Can the recipe Mummy Oreo Balls Recipe be prepared in advance?
Absolutely! You can prepare the Mummy Oreo Balls in advance to save time on the day of your event. Simply follow all the steps up to coating the balls in white chocolate and decorating them. Store the prepared balls in the refrigerator until you’re ready to serve them. This way, you can have these delightful treats ready to impress your guests effortlessly.
What ingredients can be substituted in the recipe Mummy Oreo Balls Recipe?
If you want to customize your Mummy Oreo Balls, there are several ingredient substitutions you can make. For example, you can use different flavors of Oreo cookies to create unique variations. Additionally, you can experiment with different types of chocolate coatings or decorations to suit your taste preferences.
How to adapt the recipe Mummy Oreo Balls Recipe for a vegetarian version?
To make a vegetarian version of the Mummy Oreo Balls, ensure that all your ingredients are vegetarian-friendly. Opt for vegetarian cream cheese and white chocolate, which are readily available in most stores. By making these simple swaps, you can create a delicious vegetarian treat that everyone can enjoy.
Is the recipe Mummy Oreo Balls Recipe suitable for children?
Absolutely! The Mummy Oreo Balls recipe is perfect for children, as they are fun to make and even more fun to eat. Kids can join in the preparation process by helping roll the Oreo mixture into balls or decorating the mummies with candy eyeballs. These treats are a hit at Halloween parties and will surely delight both kids and adults alike.
Conclusion about the recipe Mummy Oreo Balls Recipe
Creating Mummy Oreo Balls is a delightful and enjoyable experience that brings a festive touch to any occasion, especially Halloween. Whether you’re looking for a creative treat to impress your guests or a fun activity to do with your kids, these spooky snacks are a perfect choice. With their simple preparation and delicious taste, Mummy Oreo Balls are sure to become a favorite go-to recipe for all your Halloween celebrations. Get ready to delight your friends and family with these adorable and tasty treats!
📌 Keep This Recipe Handy & Discover More Tasty Ideas!
Enjoyed this recipe? Don’t let it slip away! Save it now on Pinterest so it’s always just a click away. Pinning it also helps others find simple, delicious meal ideas!
💡 Whether you’re organizing your weekly meal plan or whipping up something special for guests, having your go-to recipes saved makes life in the kitchen so much easier. Use Pinterest to collect your favorites, explore new versions of classic dishes, and revisit your top meals anytime.
📲 Don’t forget to follow us on Pinterest for a daily dose of inspiration — from cozy family dinners and quick lunches to seasonal desserts and healthy snacks. We update regularly with recipes designed to fit your lifestyle and taste.
📖 Craving more? Head over to our full recipe library to browse a wide variety of easy and flavorful dishes. No matter your skill level, you’ll find recipes that are simple to make and packed with flavor.
✨ Bookmark your favorites and swing by often — there’s always something fresh and delicious waiting for you!
