Follow Me On Social Media!
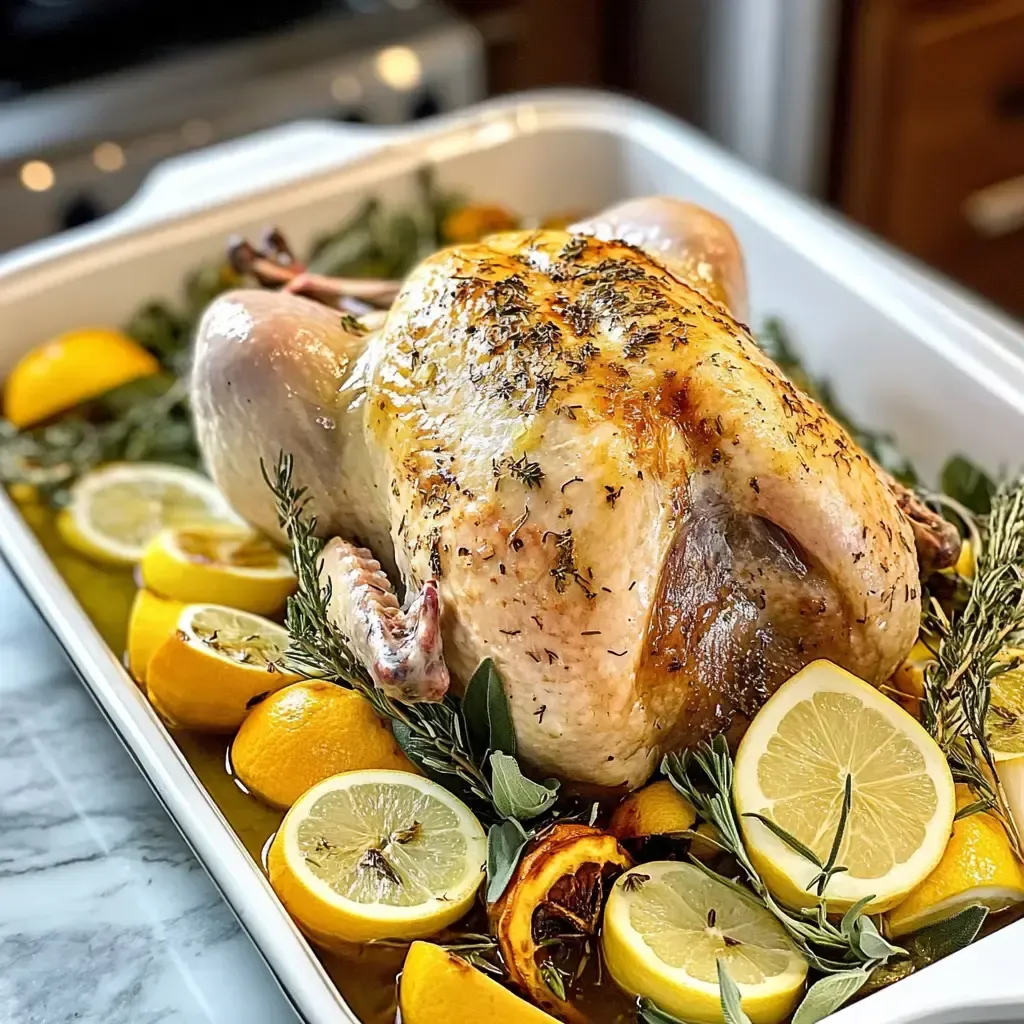
Are you ready to elevate your Thanksgiving game and impress your guests with the juiciest, most flavorful turkey they’ve ever had? Look no further than learning how to dry brine a turkey! This simple yet game-changing method involves rubbing a mixture of kosher salt, dried herbs like thyme, sage, and rosemary, and black pepper all over and under the turkey’s skin a few days before cooking. The result? A turkey that’s not only incredibly juicy and seasoned throughout but also boasts a crispy skin that will have everyone reaching for seconds.
Say goodbye to the days of messy liquid brines that take up valuable fridge space! Dry brining is the way to go for a stress-free and delicious Thanksgiving turkey experience. By letting the salt work its magic on the bird, you’ll be rewarded with tender, moist meat and perfectly crispy skin. Trust me, once you try dry brining, you’ll never go back to the traditional methods again. So, grab your kosher salt, dried herbs, black pepper, and a whole turkey, and get ready to transform your holiday feast into something truly extraordinary. Your taste buds will thank you!
Quick Benefits
- Creates the juiciest and most flavorful turkey you’ll ever taste
- Easier and less messy than traditional wet brining
- Produces crispy skin while keeping the meat tender and moist
- Uses simple ingredients like salt, herbs, and pepper
Why You’ll Love This Ultimate Guide to Dry Brining Turkey Recipe
- This recipe produces the juiciest and most flavorful turkey you’ll ever taste, making it a show-stopping centerpiece for any holiday meal.
- The dry brining method is incredibly easy and hassle-free compared to traditional wet brining, saving you time and effort in the kitchen.
- The combination of kosher salt, dried herbs, and black pepper creates a perfect balance of flavors that enhance both the skin and meat of the turkey.
- By allowing the turkey to brine for at least a day (or up to three days), you ensure that the meat is tender, moist, and seasoned all the way through.
- The crispy skin that results from dry brining will have everyone fighting over the last piece, adding a delicious textural element to your turkey.
- Using natural, unseasoned turkey ensures that you have full control over the flavors and seasonings, resulting in a turkey that is perfectly tailored to your taste preferences.
Ingredients for Ultimate Guide to Dry Brining Turkey
- 1 whole turkey (14-16 pounds).
- 1 1/2 teaspoons dried herbs (thyme, sage, rosemary).
- 3 tablespoons kosher salt.
- 3/4 teaspoon black pepper.
Pro Tips for Ultimate Guide to Dry Brining Turkey
Dry brining a turkey is a game-changer for Thanksgiving dinner. Use Diamond Crystal kosher salt for even distribution. Don’t rinse the salt off after applying to let it work its magic. Give the turkey at least a full day in the fridge, but for the best results, aim for three days for maximum flavor and juiciness. Remember, the longer you brine, the better the outcome.
For a flavorful and juicy turkey, don’t skimp on the dried herbs like thyme, sage, and rosemary. Make sure to use fresh ground black pepper for maximum flavor impact. Choose a natural turkey that isn’t pre-seasoned for the best results. Dry brining is a fantastic alternative to traditional wet brining, yielding a crispy skin and tender meat. Enjoy a stress-free Thanksgiving by trying out this simple yet effective dry brining method.
How to Make Ultimate Guide to Dry Brining Turkey
Step 1: Step 01
Combine salt, herbs, and pepper in a bowl.
Step 2: Step 02
Take out the giblets and neck from the turkey.
Step 3: Step 03
Use paper towels to dry the turkey.
Step 4: Step 04
Carefully lift the skin on the breast and legs.
Step 5: Step 05
Sprinkle 2 teaspoons of salt inside the cavity.
Step 6: Step 06
Massage 2 teaspoons of the mixture under the skin of the legs.
Step 7: Step 07
Massage 4 teaspoons of the mixture under the skin of the breasts.
Step 8: Step 08
Evenly distribute the remaining mixture on the skin.
Step 9: Step 09
Fold wings under the breast.
Step 10: Step 10
Chill uncovered in the refrigerator for 1-3 days.
📌 Pin for later!
Storage Tips
After dry brining your turkey with a simple mix of kosher salt, dried herbs, and black pepper, it’s essential to store the turkey properly before cooking to ensure the best results. Once you have massaged the salt and herb mixture all over and under the skin of the turkey, place it in a large resealable plastic bag or wrap it tightly in plastic wrap. Make sure the turkey is securely sealed to prevent any leakage or contamination in the fridge. It is recommended to let the turkey dry brine in the refrigerator for at least one day, but for optimal flavor and tenderness, leaving it for three days yields the best results.
During the dry brining process, it’s crucial not to rinse the turkey after applying the salt mixture. Rinsing could wash away the flavorful juices that the salt has drawn out and reabsorbed into the meat. Additionally, make sure to use kosher salt rather than table salt, as kosher salt’s larger crystals are better at evenly seasoning the turkey without making it too salty. By allowing the turkey to dry brine in the fridge for the recommended time and following these storage tips, you will achieve a flavorful, juicy turkey with crispy skin that will impress your guests.
Ingredient Substitutions
If you don’t have Diamond Crystal kosher salt, you can substitute with any other brand of kosher salt. Just be sure to use the same amount called for in the recipe to ensure the proper level of seasoning.
For the dried herbs, if you don’t have thyme, sage, or rosemary on hand, you can experiment with other dried herbs like oregano, marjoram, or parsley. Feel free to mix and match based on your preferences to create a customized herb blend for your turkey.
If you prefer a bit of heat or a different flavor profile, you can add spices like paprika, garlic powder, onion powder, or even a pinch of cayenne pepper to the dry brine mixture. Just remember to balance the flavors and not overwhelm the natural taste of the turkey.
Serving Suggestions
For a delicious twist on serving your dry-brined turkey, consider carving the juicy and flavorful meat tableside in front of your guests. This interactive experience not only adds a touch of elegance to your meal but also allows everyone to admire the perfectly seasoned and crispy skin before it’s enjoyed. Pair the succulent turkey slices with a side of homemade cranberry sauce and roasted vegetables for a complete and memorable holiday feast.
To elevate your dry-brined turkey even further, consider serving it on a platter garnished with fresh herbs such as thyme, sage, and rosemary. The fragrant herbs not only add a pop of color to your presentation but also enhance the already robust flavors of the turkey. Accompany the herb-infused turkey with a drizzle of gravy made from the pan drippings for a luxurious finishing touch that will have your guests coming back for seconds and thirds.
FAQs for Ultimate Guide to Dry Brining Turkey
Can I use table salt instead of kosher salt for dry brining a turkey?
No, it’s recommended to use kosher salt for dry brining because table salt is much finer and could make the turkey too salty.
How long should I dry brine the turkey for?
While one day works, three days gives the best results for the salt to fully penetrate the meat.
Do I need to rinse the turkey after dry brining?
No, don’t rinse. The salt will be absorbed properly and rinsing could contaminate your kitchen.
Why should I let the dry brined turkey sit in the fridge for a few days?
This helps the skin dry out, resulting in crispier skin when cooked.
Conclusion
In conclusion, mastering how to dry brine a turkey can truly revolutionize your Thanksgiving feast. The simplicity of rubbing salt, herbs, and pepper onto the turkey and letting it work its magic in the fridge will elevate the flavors and textures to a whole new level. Say goodbye to bland and dry turkey – with dry brining, you’ll achieve juicy, flavorful meat and crispy skin that will have your guests coming back for seconds!
So, this holiday season, give dry brining a try and experience the difference for yourself. With just a few simple ingredients and a little bit of patience, you’ll be rewarded with a turkey that is moist, flavorful, and sure to impress your family and friends. Embrace the ease and delicious results of dry brining – it’s a game-changer for your Thanksgiving table!
📌 Pin for later!
Ultimate Guide to Dry Brining Turkey
“Transform your Thanksgiving turkey with this easy dry brine method for the juiciest, most flavorful bird ever – no more boring turkey!”
Prep Time30 Minutes
Cook Time~ undefined
Total Time30 Minutes
CuisineAmerican
Skill LevelIntermediate
Servings1 turkey
Ingredients
- 1 whole turkey (14-16 pounds).
- 1 1/2 teaspoons dried herbs (thyme, sage, rosemary).
- 3 tablespoons kosher salt.
- 3/4 teaspoon black pepper.
Instructions
-
Step 01: Combine salt, herbs, and pepper in a bowl.
-
Step 02: Take out the giblets and neck from the turkey.
-
Step 03: Use paper towels to dry the turkey.
-
Step 04: Carefully lift the skin on the breast and legs.
-
Step 05: Sprinkle 2 teaspoons of salt inside the cavity.
-
Step 06: Massage 2 teaspoons of the mixture under the skin of the legs.
-
Step 07: Massage 4 teaspoons of the mixture under the skin of the breasts.
-
Step 08: Evenly distribute the remaining mixture on the skin.
-
Step 09: Fold wings under the breast.
-
Step 10: Chill uncovered in the refrigerator for 1-3 days.