Follow Me On Social Media!
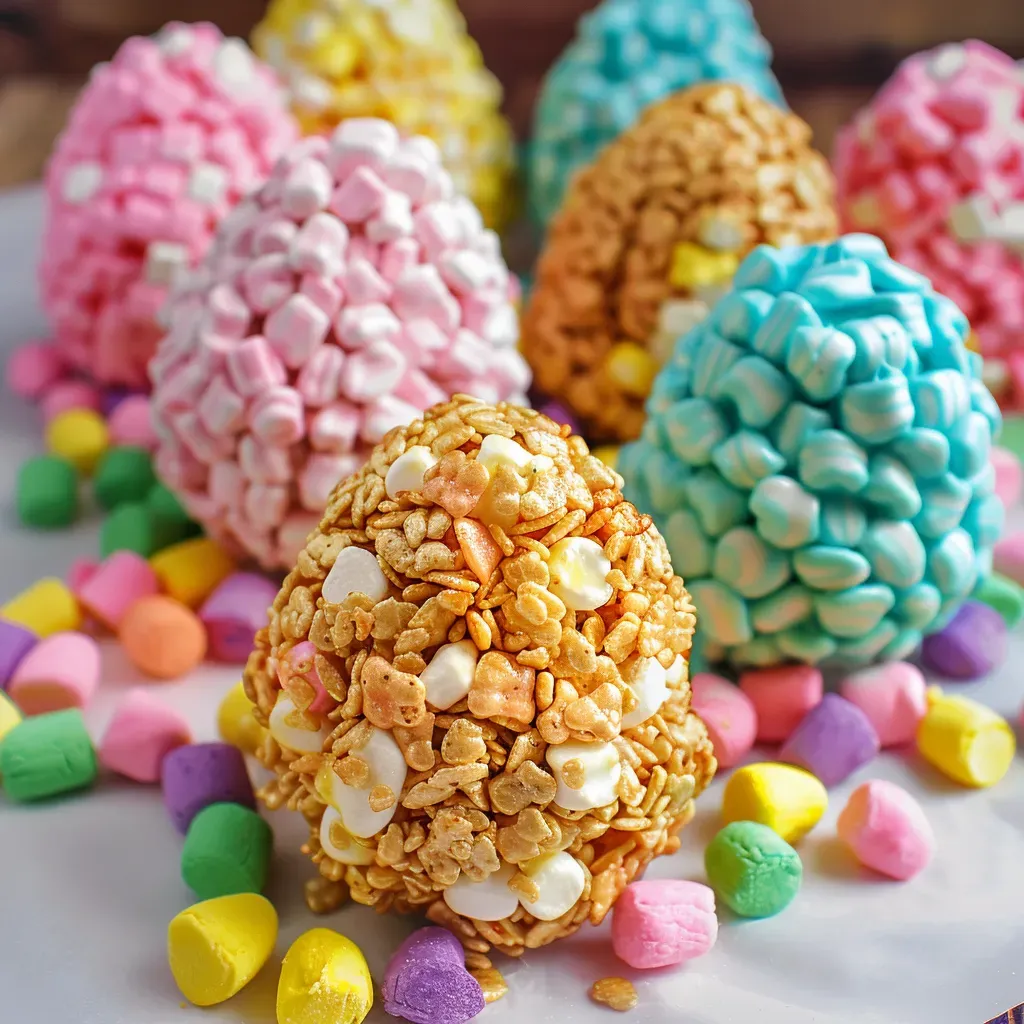
Easter is just around the corner, and what better way to celebrate than with vibrant and delicious Rice Krispie Easter Eggs! These delightful treats are a fun and colorful twist on the classic cereal recipe. By combining butter, mini marshmallows, and Kellogg’s Rice Krispies Cereal, you can create five different colored batches of eggs that are perfect for the holiday season.
The magic of these Rice Krispie Easter Eggs lies not only in their festive appearance but also in the nostalgia they bring with every bite. The familiar snap-crackle-pop of the cereal, combined with the sweet marshmallow goodness, will transport you back to childhood Easter egg hunts in an instant. Easy to make and a joy to shape by hand, these treats are sure to be a hit with both kids and adults alike at any Easter gathering.
Whether you’re looking to add a pop of color to your holiday table or create a sweet surprise for your loved ones, these Rice Krispie Easter Eggs are the perfect choice. With their vibrant pastel hues and irresistible taste, these eggs are a delightful addition to any Easter celebration. So gather your ingredients and get ready to create a batch of these adorable and delicious treats that will surely spread Easter cheer!
Quick Benefits
- Colorful Easter Treats: These Rice Krispie Easter Eggs are a vibrant addition to any holiday table, bringing festive colors and shapes that delight both kids and adults alike.
- Easy and Fun to Make: With just a few simple ingredients and minimal prep time, these treats are a fun and creative activity for the whole family to enjoy.
- Nostalgic Comfort: The classic Rice Krispie base combined with the sweet marshmallow flavor creates a nostalgic taste that transports you back to childhood with every bite.
- Long-lasting Enjoyment: Whether served fresh or frozen for later, these treats can be stored for several days or up to three months, allowing you to enjoy the Easter spirit even after the holiday has passed.
Why You’ll Love This Easter Rice Krispie Eggs Recipe Recipe
- Nostalgic Flavors with a Twist: Experience the classic snap-crackle-pop sensation of Rice Krispie treats with a festive Easter twist that perfectly combines childhood joy with holiday celebration.
- Vibrant and Eye-catching Colors: The pastel hues of these Easter eggs will catch your eye and bring a pop of color to any table, making them a delightful addition to your Easter spread.
- Perfectly Sized Portions: Individually shaped into Easter egg forms, these treats are not only adorable but also perfectly sized for serving, gifting, or adding to Easter baskets, making them a versatile and fun option for any occasion.
- Creative Expression: Get creative with colors and shapes using this foolproof recipe base that allows for endless variations, making it a fun and engaging activity for kids and adults alike.
- Simple Ingredients, Delicious Results: With just a few basic ingredients like Rice Krispies cereal, marshmallows, butter, and food coloring, you can create a mouthwatering treat that is both easy to make and incredibly satisfying to eat.
- Tips for Success: Follow expert tips on ingredient quality, melting techniques, color mixing, shaping, and storage to ensure that your Rice Krispie Easter Eggs turn out perfectly every time, with the ideal chewy-crispy texture and vibrant colors.
- Generational Connection: These colorful Easter eggs bridge the gap between generations, offering a modern twist on a traditional treat that appeals to both children and adults, creating a shared experience that everyone can enjoy.
Ingredients for Easter Rice Krispie Eggs Recipe
Base ingredients
- 15 tablespoons butter (salted, sweet cream butter works best)
- 15 cups mini marshmallows
- 15 cups Kellogg’s Rice Krispies Cereal
For coloring
- Wilton Color Right Food Coloring (pink, blue, and yellow)
Pro Tips for Easter Rice Krispie Eggs Recipe
For the best results, ensure you use fresh Rice Krispies cereal and mini marshmallows to maintain the perfect texture and flavor. Opt for gel food coloring for vibrant shades without altering the consistency of the mixture. When melting the marshmallows, be patient with low heat to prevent the treats from becoming tough and hard.
When working with multiple colors, make separate smaller batches for each color to keep the mixture warm and pliable for shaping. Use a food scale to portion out equal amounts for uniform egg shapes, and wet your fingertips slightly to help smooth any rough edges while shaping. Remember that storing these treats at room temperature in an airtight container maintains their best texture and freshness, with freezing as a viable long-term storage option.
How to Make Easter Rice Krispie Eggs Recipe
Step 1: Step 01
Prepare five batches of Rice Krispie Treat mixture in separate bowls, one for each color: Yellow, Green, Blue, Purple, and Pink. Each batch yields approximately 5 Easter eggs, totaling 25 colorful eggs.
Step 2: Step 02
In a medium saucepan over low heat, melt 3 tablespoons of butter. Add 3 cups of mini marshmallows and stir constantly until melted and smooth.
Step 3: Step 03
Take the pan off the heat and mix in food coloring based on the desired egg color: Yellow (3 drops pink), Pink (4 drops pink), Purple (3 drops pink + 2 drops blue), Green (4 drops yellow + 1 drop blue), or Blue (4 drops blue). Stir well to distribute the color evenly.
Step 4: Step 04
Gently fold 3 cups of Rice Krispies cereal into the colored marshmallow mixture until fully coated and slightly sticky. Allow the mixture to cool until it is easy to handle.
Step 5: Step 05
Let the mixture cool for 1-2 minutes. Use slightly damp hands to prevent sticking, shape a handful of the mixture into an egg shape. Place shaped eggs on wax paper or parchment paper to cool.
Step 6: Step 06
Repeat the process for each remaining color, ensuring to wash and dry the saucepan between batches to maintain vibrant colors and prevent mixing.
📌 Pin for later!
Storage Tips
Once you have made the vibrant and festive Rice Krispie Easter Eggs, it is essential to store them properly to maintain their freshness and texture. These treats can be stored in an airtight container at room temperature for 3-4 days. Avoid refrigerating them, as the cold temperature can make them too firm. For longer storage, you can freeze the Easter eggs for up to 3 months. Simply thaw them at room temperature for about 30 minutes before serving to enjoy them at their best.
To ensure the best results when storing your Rice Krispie Easter Eggs, it is recommended to store them in a single layer in the airtight container to prevent them from sticking together. If you need to stack the eggs, place a sheet of parchment paper or wax paper between the layers to maintain their shape and prevent them from becoming too compressed. By following these storage tips, you can enjoy these colorful and delicious Easter treats for several days or even freeze them ahead of time for future celebrations.
Ingredient Substitutions
For the Rice Krispie Easter Eggs recipe, you can make some ingredient substitutions based on your preferences or dietary needs. If you prefer a healthier option, you can use a brown rice cereal or a gluten-free crispy rice cereal instead of the traditional Rice Krispies. This substitution will alter the texture slightly but will still result in delicious Easter eggs.
If you are looking to make a vegan version of these Easter treats, you can replace the butter with a plant-based butter or margarine. Ensure the plant-based butter has a similar consistency to regular butter for the best results. Additionally, you can use vegan marshmallows instead of mini marshmallows to keep the recipe entirely plant-based while maintaining the sweet and chewy texture of the original recipe.
Another potential substitution is using natural food coloring instead of the Wilton Color Right Food Coloring. Natural food colorings derived from fruits, vegetables, or spices can provide vibrant hues without artificial additives. Be mindful of the intensity of natural colors and adjust accordingly to achieve the desired pastel shades for the Easter eggs.
Serving Suggestions
Serve these vibrant Rice Krispie Easter Eggs on a decorative platter alongside edible grass for a whimsical and festive Easter display. The colorful hues and egg shapes will capture the attention of both kids and adults, making them a delightful addition to any holiday gathering. For an extra touch, consider adding a sprinkle of edible glitter or small candy decorations to enhance the Easter theme.
Another fun serving suggestion is to package these Rice Krispie Easter Eggs individually in clear cellophane bags tied with pastel-colored ribbons. These make for charming party favors or gifts for guests to take home after the celebration. The personal touch of a handcrafted treat, combined with the bright colors and sweet flavor, will leave a lasting impression and spread joy during the holiday season.
FAQs for Easter Rice Krispie Eggs Recipe
Can I use natural food coloring instead of gel food coloring?
Yes, you can use natural food coloring, but keep in mind that it may result in softer hues compared to the vibrant colors achieved with gel food coloring.
How should I store the Rice Krispie Easter Eggs for the best texture?
Store the Easter eggs in an airtight container at room temperature for the best texture. Avoid refrigerating them, as this can make the treats too firm.
Why should I make separate batches for each color instead of dividing one large batch?
Making separate batches for each color helps keep the mixture warm and pliable for shaping. Dividing one large batch would cool too quickly, making it harder to shape the eggs.
How can I prevent the Rice Krispie Easter Eggs from turning out tough and hard?
To prevent the treats from turning out tough and hard, make sure to melt the marshmallows over low heat instead of high heat. Patience with low heat will result in the perfect chewy-crispy texture.
Conclusion
As you embark on creating your own batch of Rice Krispie Easter Eggs, remember that the magic of this recipe lies not just in its vibrant colors and festive shapes, but in the memories and connections it fosters. Whether you’re making these treats for loved ones, friends, or simply for yourself, the joy they bring is truly timeless and universal.
So, gather your ingredients, unleash your creativity with the Wilton Color Right Food Coloring, and embrace the simple pleasure of shaping these colorful eggs. Allow yourself to be transported back to the joys of childhood while reveling in the present moment of creating something special. Share these delightful treats with your nearest and dearest, and witness the smiles and delight they bring to all who enjoy them.
May your Rice Krispie Easter Eggs be a symbol of celebration, togetherness, and the enduring magic of simple pleasures. Wishing you a joyful and sweet Easter filled with love, laughter, and delicious treats that bring warmth to your heart and home. Happy baking, and may your Easter be as bright and cheerful as these delightful Rice Krispie Easter Eggs!
📌 Pin for later!
Easter Rice Krispie Eggs Recipe
Rice Krispie Easter Eggs: Transforming classic treats into vibrant, egg-shaped delights for a festive and nostalgic Easter celebration.
Prep Time10 Minutes
Cook Time20 Minutes
Total Time30 Minutes
CuisineAmerican
Skill LevelEasy
Servings25 Servings (25 Easter eggs)
Ingredients
Base ingredients
- 15 tablespoons butter (salted, sweet cream butter works best)
- 15 cups mini marshmallows
- 15 cups Kellogg’s Rice Krispies Cereal
For coloring
- Wilton Color Right Food Coloring (pink, blue, and yellow)
Instructions
-
Step 01: Prepare five batches of Rice Krispie Treat mixture in separate bowls, one for each color: Yellow, Green, Blue, Purple, and Pink. Each batch yields approximately 5 Easter eggs, totaling 25 colorful eggs.
-
Step 02: In a medium saucepan over low heat, melt 3 tablespoons of butter. Add 3 cups of mini marshmallows and stir constantly until melted and smooth.
-
Step 03: Take the pan off the heat and mix in food coloring based on the desired egg color: Yellow (3 drops pink), Pink (4 drops pink), Purple (3 drops pink + 2 drops blue), Green (4 drops yellow + 1 drop blue), or Blue (4 drops blue). Stir well to distribute the color evenly.
-
Step 04: Gently fold 3 cups of Rice Krispies cereal into the colored marshmallow mixture until fully coated and slightly sticky. Allow the mixture to cool until it is easy to handle.
-
Step 05: Let the mixture cool for 1-2 minutes. Use slightly damp hands to prevent sticking, shape a handful of the mixture into an egg shape. Place shaped eggs on wax paper or parchment paper to cool.
-
Step 06: Repeat the process for each remaining color, ensuring to wash and dry the saucepan between batches to maintain vibrant colors and prevent mixing.